Administrators Guide
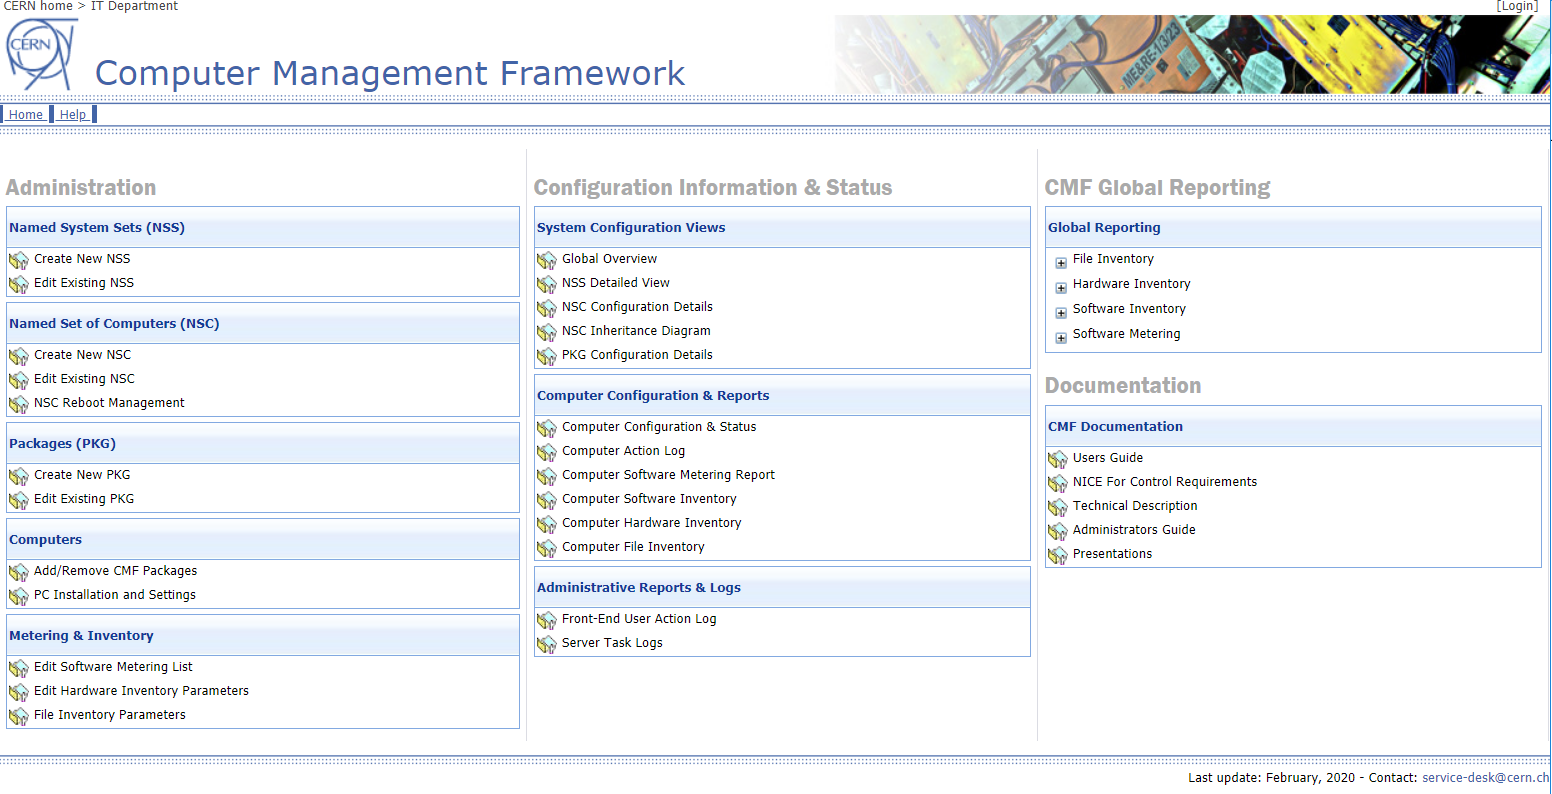
The CMF web site
The CMF web site is the only supported way to configure your sets and packages. Modifying the CMF configuration in any other way could lead to data and synchronization mismatches.
The CMF web site is divided into 3 parts:
-
The administration tools allowing the administrators to create NSCs and PKGs. The system includes delegation mechanism between the 3 object types (NSS, NSC and PKG). Note that only the general CMF administrators are allowed to create new NSSs. The access to these objects is restricted according to the permission and delegation settings.
Some additional CMF features, such as software & hardware metering, software inventory can also be controlled from the web site. -
The configuration and status info: From these pages, every logged on user can see the status of various items in the CMF system, such as configuration and status info about a single computer or NSC, global error reports, metering & inventory, action logs,...
-
All CMF documentation and external links is being moved to https://devices.docs.cern.ch/devices/windows/cmf
The following paragraph concerning the usage of the CMF management tools will explain how you can create and edit your groups of computers and how you can assign centrally provided or custom packages to it.
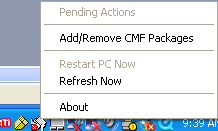
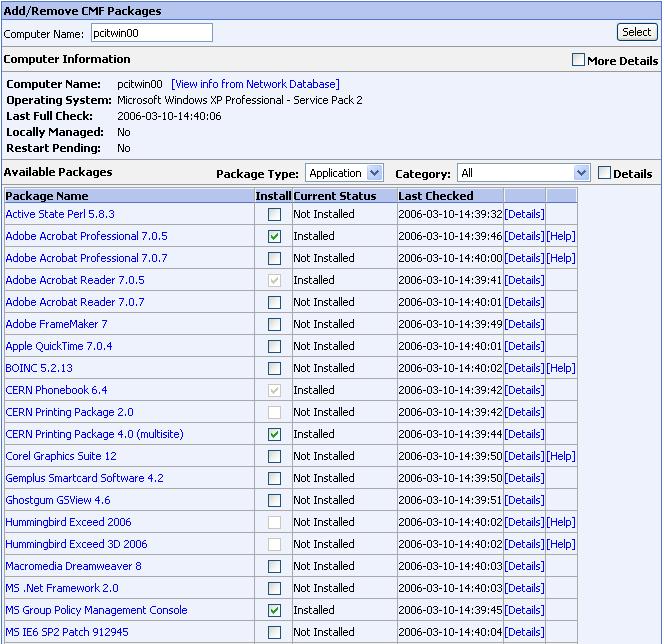
Add/Remove CMF Packages
This web based interface is a replacement for the Windows Add/Remove programs control panel applet. It allows the user to install and remove applications that are published via CMF on the computer or the logged on user.
- Installing and removing a package: By clicking the install check box, CMF will install the package and control the status of it, in the same as this is done when a package is applied via a NSC (computer group). When the installation gets removed by any other means (eg. manual remove, computer reinstallation), the package will be reinstalled by CMF. However when the Install box is not checked, CMF will only remove the package once. A manual installation later will not be removed by CMF afterwards, but will be indicated as 'Installed outside CMF' in the Status column.
This interface is directly accessible from the CMF system tray icon without authentication for local control, or from the CMF web site for remote control, provided you are responsible or main user of the computer.
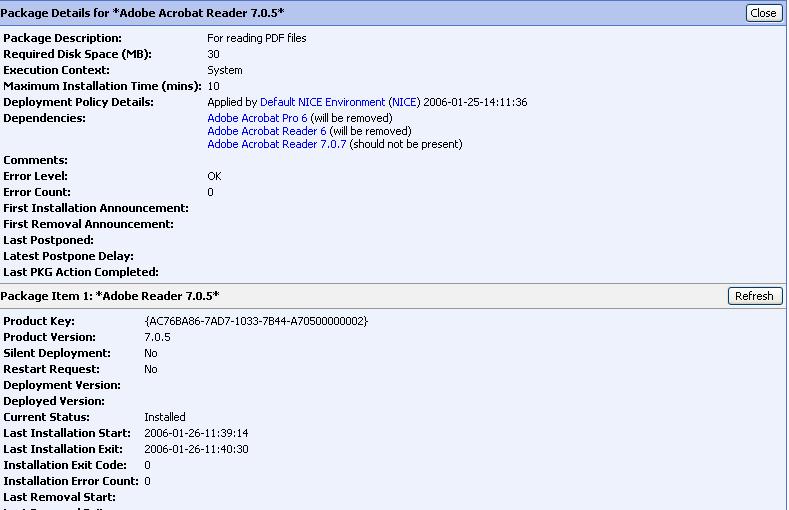
The web page contains a few additional tooltips & link providing more detailed information about the package and its deployment:
-
Package Name tooltip: Moving the mouse over a package name will return some static information of the package.

-
Current Status tooltip: Moving the mouse over an item in this column will display the dependencies for the package if any.

-
[Details] link: Clicking this link will attach a panel at the bottom of the page returning detailed status information:
-
[Help] link: This link leads to the package help page(s), if available for the package.
Centrally Managed Packages
How to Deploy Applications in the NICE Environment with CMF
In this page we examine how to deploy new applications or to upgrade applications with CMF.
Type of deployments
Applications (packages in CMF terminology) can be deployed as published, published+installed, applied or denied.
PUBLISHED packages
Published packages are packages that are available for installation by the PC Owner on all PC members of the NSC. Recently publishing packages for a user was added to CMF.
PUBLISHED+INSTALLED packages
Published+Installed packages are packages that are automatically installed during the OS installation or when the package is initially deployed. These packages can be uninstalled by the PC Owner on any PC member of the NSC. This type of deployment allows most PC to have this software by default, but also allows easily removing this software and maybe installing another version.
APPLIED / ASSIGNED packages
Assigned packages are packages that are mandatory installed on all PC member of the NSC. Only the required packages should be applied. The only way to avoid installing an applied package on a particular PC, is to define the package as Denied on a NSC from which this PC is member.
DENIED packages
Denied packages are automatically uninstalled if present and blocked from installing otherwise on all PC member of the NSC.
Deployments of packages
Packages can be completely new or may be upgrades of already deployed packages. Deployments are slightly different in both cases.
Deployment of a new package
Deployment of a new package should undergo several steps:
1) Package is created with name 'Vendor Application_name Version' and documentation is written. The package private flag is set.
2) Test the new package installation / uninstallation on a specific NSC limited to very few computers owned by the package maintainer: the package is usually Published on the Test NSC.
3) Begin deployment of the new package on a specific 'Early Deployment' NSC for this package, by several people: the package is usually Published on the NSC first; it can be Applied or Published+Install when needed for broader testing by the members of the NSC. Members of the 'Early Deployment' NSC can change over time (for example, from some PCs in IT-IS, to all PCs in IT-IS, to all PCs in IT-IS and IT-UDS, to all PCs in IT, to all PCs for some departments), but have to be warned appropriately. For simplicity, NSC 'Testing Applications (NICE-DEV) can be used as 'Early Deployment' NSC. In this case, as the membership of the 'Testing Applications' NSC cannot be modified, it will not be possible to have a gradual deployment between test and production.
4) If the feedback requires a modification of the package, two situations can occur:
- The modification is minor, the package is changed (new installations will get the change) and maybe redeployed (current installations will redo the installation step(s) ' provided they can be redone without trouble).
- The modification is major and needs to remove the previously installed package; a new package 'APPX version n+1 (rev m)' that removes 'APPX version n+1' and all previous revisions is created and deployed.
5) This as many times as necessary until considered ok.
6) Announce to 'Desktop Services Technical Meeting' mailing list that the package will be deployed.
7) Two cases:
- If the new package will be deployed as 'Published': it is moved to the NSC 'Default NICE (NICE)'. The package private flag is removed and the package is deployed on 'Default NICE'. The type of deployment has to be chosen according to the package.
- If the new package will be deployed as 'Published+Install' or 'Applied': it is recommended to proceed with a gradual deployment using a specific 'Early Deployment' NSC. In this case, the package private flag is removed and the membership of the NSC is gradually increased group by group, department by department until reaching the whole CERN. Finally the package is moved to the NSC 'Default NICE (NICE)' and the specific 'Early Deployment' NSC can be deleted.
Deployment of an upgrade package
Two Upgrade options are possible:
- Having both versions deployed is allowed. The user freely chooses which version fits his needs. Dependencies should be set on all relevant packages, so that only one can be installed at a time (all packages must have a 'should not be present' dependency regarding to other versions).
- Only the latest version is allowed. The user has to upgrade, but can maybe choose when to upgrade. The new package has to remove any previous version, this through a CMF dependency setting. In case of Applied packages, upgrade must keep only the last version.
Upgrade of a package follows these steps:
1) Starting point: there is an application named APPX version which is currently deployed (Applied / Published / Published+Install)
2) We create a new package named APPX version n+1. All necessary dependencies with previous packages are known, understood and implemented in the package. Maybe old packages' dependencies will have to be updated also to work correctly in presence of the new package (adding 'should not be present' for the new package for example).
3) Package documentation is written / updated
TESTING PHASE
4) The new package is flagged private and is published in the NSC 'testing application (NICE-DEV)' or in a specific NSC named using the name of the application 'APPX version n+1 deployment'. Using the specific NSC is mandatory to have a gradual deployment possibility (see later).
5) The new package is also added to the 'Deny' NSC for his package family, when one exists.
6) PC owners members of the test NSC are informed and invited to install this new package to give feedback. If using the NSC 'APPX version n+1 deployment', PCs are added to the NSC as necessary, progressively.
7) If the feedback requires a modification of the package, two situations can occur:
- The modification is minor, the package is changed (new installations will get the change) and maybe redeployed (current installations will redo the installation step(s) ' provided they can be redone without trouble)
- The modification is major and needs to remove the previously installed package; a new package 'APPX version n+1 (rev m)' that removes 'APPX version n+1' and all previous revisions is created and deployed.
8) This as many times as necessary until considered ok.
9) The final package is then tested either as a 'new install' (on a computer which did not receive the previous version) and as an 'Upgrade' (on a computer which received the previous version but no other version of the upgrade). The tests are made on all targeted operating system version (win2000, XP, etc). The tests are made on a computer where the user does not have administrative privileges.
10) Uninstall tests are made under the same condition.
11) When only the last version is allowed, the package is published to the NSC and an 'Upgrade' from the previous package is performed within the test NSC. This to move manual install / uninstall user choices to the new version.
12) When only the last version is allowed, if the package replaces an older version that was 'Published+Installed', the new package is 'Published+Installed' within the test NSC.
13) When only the last version is allowed, if the package replaces an older version that was 'Applied', the new package is 'Applied' within the test NSC.
14) When both versions are allowed, the new package is Published to the test NSC.
GRADUAL DEPLOYMENT PHASE
15) This requires using a specific NSC named 'APPX version n+1 deployment'. In this case, PCs are added to the NSC as necessary to gradually enlarge the scope and number of PCs affected by the deployment. Point 11 must be redone after all change of NSC membership. Announce / Inform all affected user and service managers as necessary.
16) If the feedback requires a modification of the package, the whole process is restarted as necessary as in point 7.
GLOBAL DEPLOYMENT PHASE (Initial Publish of new version ' this steps can be skipped in case of forced upgrade)
17) Announce / Inform all affected user and service managers as necessary.
18) When gradual deployment is finished, the new package is published to NSC 'Default NICE (NICE)'. This allows all users to install the new version, on demand.
19) If only the last version is allowed, the old package publication is removed from 'Default NICE'.
GLOBAL DEPLOYMENT PHASE (forced Upgrade to new version)
20) Announce / Inform all affected user and service managers as necessary.
21) Points 11 to 13 are done one the 'Default NICE (NICE)' NSC.
22) If only the last version is allowed, the old package publication is removed from 'Default NICE'.
FINAL CLEANUP
23) In case NSC 'Testing applications' was used, publication of the new package in this NSC is removed; otherwise, when a specific NSC named 'APPX version n+1 deployment' was used, it is deleted.
24) The old package named 'APPX version n' is moved from the NSC 'Default NICE' to the NSC 'NICE Obsolete' and its description modified by appending ' ' obsolete' to expletively make user understand that the package is obsolete and has been superseded by a newer version . The old package is no longer available for NICE PCs, but still can be used on Locally Managed NSCs.
25) When no NSC does any publication of a package, it can be freely deleted.
Manage Sets and Packages
The paragraph will explain how you can create and edit your groups of computers (NSCs) and how you can assign centrally provided or custom packages to it.
Defining your activity (NSS Editing)
The first step in the use of CMF for your activity is the creation of a new Named System Set. Please contact a global CMF administrator to get your private NSS providing the following information:
- Name of the NSS
- A short Description
- Username of the Responsible
- Delegated Administrators: You can add delegated administrators by entering their NICE username. The 'Add' button will resolve the entered name to the full name and email address. Both user names and groups are supported.
Note that the NSS responsible is the official link person with the central NICE services. All delegation inside the NSS (NSCs and PKGs) is the responsibility of the NSS administrator.
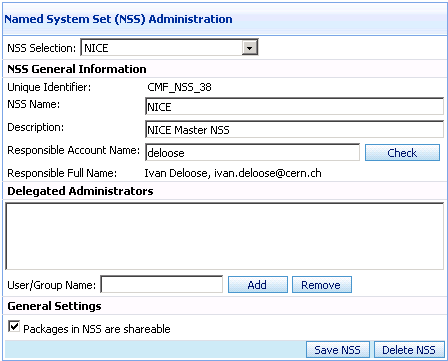
An important attribute of the NSS is the 'Shareable' property. Setting this attribute, indicates that all package inside this NSS can be re-used by other NSS. This sharing can then be blocked on the package level by setting the 'Package is private to NSS' package attribute (see the Edit Existing PKG) paragraph. The NSS has no further functionality but is only a collection for the underlying NSCs and PKGs, which can be created by the NSS administrator and delegated administrators.
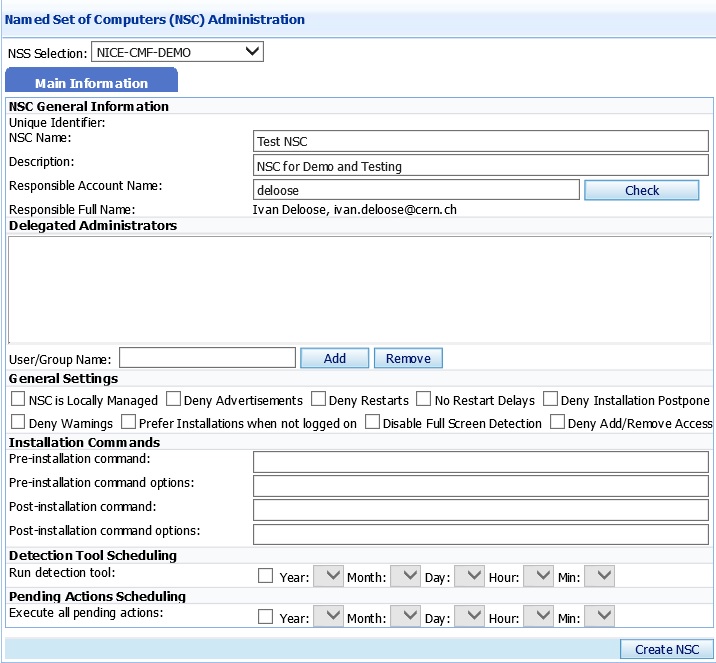
Creating a new Named Set of Computers (Create New NSC)
The creation of a new NSC is limited to the NSS responsible and the delegated administrators. The NSC can on its turn be delegated to the NSC responsible and delegated NSC administrators. The following fields are required to create a new NSC after selecting the concerned NSS:
- Name of the NSC
- A short Description
- Username of the Responsible
Editing a Named Set of Computers (Edit Existing NSC)
The NSC edit window consists of 3 sub pages (tabs):
Main Information, defining general settings about the NSC:
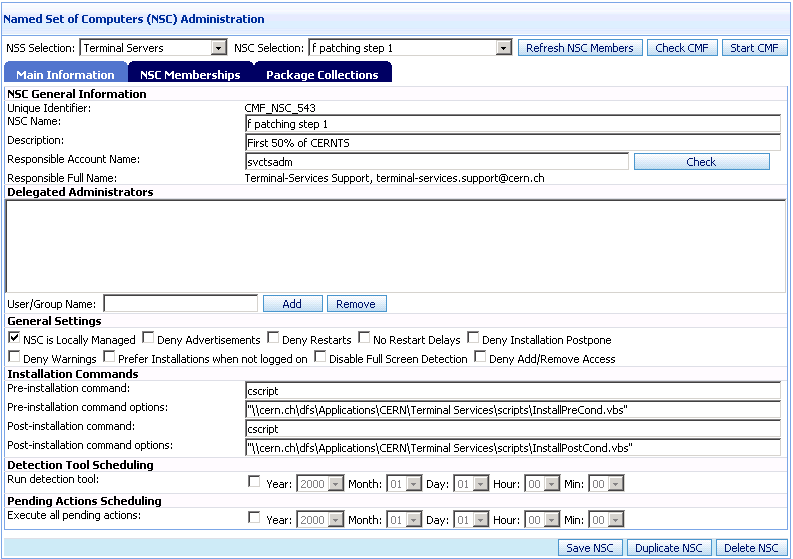
- Unique Identifier: The database record ID, identifying the NSC and displayed as CMF_NSC_[id].
- NSC Name: Name of the NSC
- Description: A short description for the NSC
- Responsible Account Name: Username of the person responsilbe for the NSC
- Delegated Administrators: You can add delegated administrators by entering their NICE username. The 'Add' button will resolve the entered name to the full name and email address. Both user names and groups are supported.
- NSC is Locally Managed (LM): This is probably the most important attribute of the NSC. This attribute must be set when you need the full control over a group of computers. In this case, the members (PCs) of the NSC will only receive packages which are explicitly assigned by this NSC. PCs which are member of a locally managed NSC will not receive any package applied via a non locally managed PC. An example is the general deployment of Office to all CERN computers, but PCs member of a locally managed NSC will not receive it. However when a new package must be deployed CERN wide, such security patches, the package will never be forced to locally managed PCs, but the NSC responsible will be informed about the new package by email. He will be warned about an expiration date when he must apply the package to his NSC, if not he could face connectivity restrictions imposed by the Security Team when some vulnerability gets detected. Attention special condition: In case that this NSC is not locally managed, but a member PC is also member of another but locally managed NSC, then this NSC will not apply to that member.
- Deny Advertisements: This attribute has an impact on the package advertisements messages via the CMF balloon. Checking this attribute will disable the announcement of newly applied packages.
- Deny Restarts: This attribute disables the automatic reboot feature when this is requested by the installation of a package. A PC with the Reboot Denied attribute set will never be rebooted by CMF, but a warning balloon will appear regularly inviting the user to reboot the PC.
- Deny Restart Delays: CMF Packages can define a delay for rebooting the PC after the installation. This attribute overrides this delay and all members of the NSC will reboot immediately after the installation of the concerned packages.
- Deny Installation Postpone: This attribute disables the possibility to postpone the installation of a package by the user. In this case, all packages are installed as soon they as applied by any NSC. As soon a PC is member of 1 NSC having this attribute set, no postpone is allowed in general.
- Deny Warnings: This attribute disables all pop-up warning windows. This implies that no installation warnings will be shown and that the actions cannot be postponed.
- Prefer Installation when not Logged on: When setting this attribute, CMF will try to install the packages when nobody is logged on. CMF will not install the concerned packages until nobody is logged on for more than 1 minute or until the 'Postpone Delay' or 'Expiration Forced Date' has been reached.
- Disable Full Screen Detection: Normally CMF detects when an application is running in full screen mode, eg. a Powerpoint presentation. In this case, CMF will not perform any action. This attribute allows to override this behaviour so that packages can be installed anyway.
- Deny Add/Remove Access: When this attribute is checked, the 'Add/Remove CMF Packages' item in the CMF system tray menu will be hidden. This is useful for public PCs where the non-authenticated 'Add/Remove' feature should be disallowed.
- Pre* and Post-installation commands: These commands allow to run a custom script before and after a installation sequence. This is mostly used by terminal servers, eg. to logoff all users before patching the machines. Note that this option is only available to full CMF administrators.
- Detection Tool Scheduling: With this attribute, you can force the CMF DetectTool (WSUS scanner) to run for all members of the NSC from a given point in time.
- Pending Actions Scheduling: This attribute allows to force the execution of all pending actions for all members of the NSC from a given point in time.
Memberships, defining the computer (NSC) and user (NSU) members. These memberships are directly stored into Active Directory security groups, named as CMF_NSC_[id] and CMF_NSC_[id]_NSU, where [id] stands for the unique identifier of the NSC.
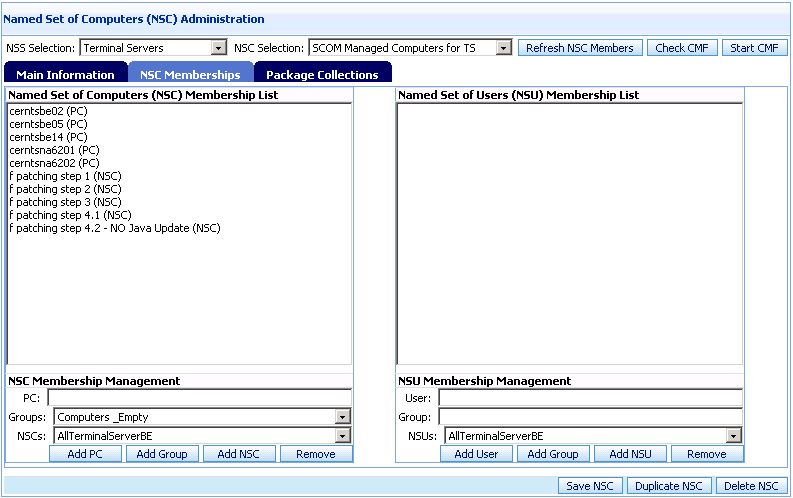
- Refresh NSC Members: This action sends a refresh signal to all members of the NSC in order to wake up the service and produce a full check.
- Check CMF: The action will produce a list of all members where CMF was not responding over the last 24 hours.
- Start CMF: The action will try to start the CMF service on all members where CMF was not responding over the last 24 hours.
- NSC Membership List: This list can contain a single PC, another NSC from within the same NSS or a Windows security group (restricted to global CMF Admins). Once a NSC is defined, it can be used to publish, apply or deny packages to its members (computers).
- NSU Membership List: This list can contain a single user, another NSU from within the same NSS, or a Windows security group containing only user objects. Once a NSU is defined, it can be used to publish packages to users or it is also used to apply the user part of Group Policies of the concerned computers defined by the NSC members.
Package Collections, defining the actions to be performed on the members of the NSC.
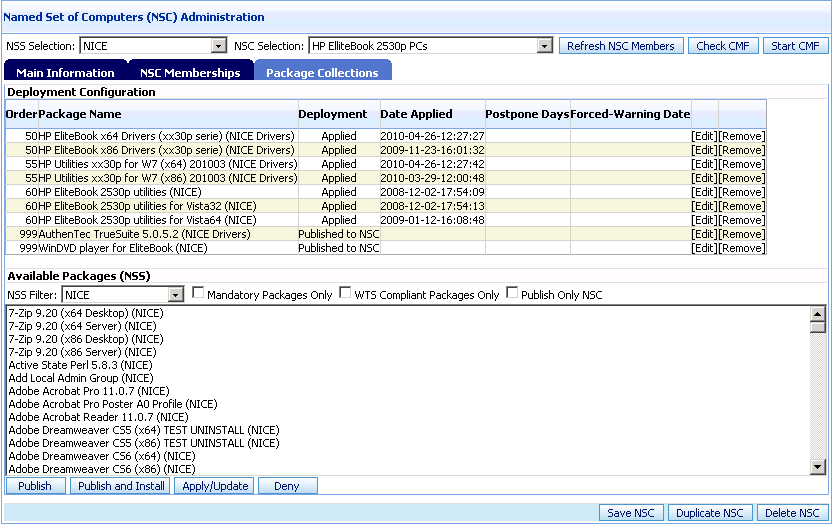
A package collection is a list of packages with the following attributes:
- Order: Order of execution of the package where order = 1 has the highest priority.
- Name of the package: selected from the 'Available Packages' list on the bottom of the page. All packages internal to the NSS or shareable packages from other NSS can be selected for deployment.
- Deployment Type: A package can be
- Published to a NSC: The package is published via the Add/Remove CMF packages interface on the computers member of the NSC.
- Published to a NSU: The package is published via the Add/Remove CMF packages interface to the users which are member of the NSU.
- Applied: The package is targeted onto the member computers. Depending whether the 'Postpone Days' or 'Forced/warning date' attribute is set, the user has no possibility to refuse the installation of the package. Even a manual removal will force a re-installation by CMF.
- Denied: The package is denied (strongest action) to the member computers. The user has no possibility to install package, even a manual installation will be removed by CMF.
- Postpone Days: The number of days the user is allowed to postpone the installation after he received the first announcement. If the value is zero, the package installation cannot be postponed. An empty field has no impact on the execution. Note that this attribute only applies to deployments of type 'Applied'.
- Expiration Warning/Force Date: The date field has a double function, depending whether the PC is locally managed or not.
- The PC is centrally managed or the PC is locally managed and member of this locally managed NSC: The package will be installed on the PC at latest at the expiration date.
- This NSC is centrally managed but the PC is locally managed through another NSC: Once the expiration date passed, the NSC responsible will be automatically informed by email about the package and its expiration, and he will be warned to apply the package as soon as possible. Note that this attribute only applies to deployments of type 'Applied'.
If both 'Postpone Days' and 'Expiration Date' are specified, the first one reached in time will trigger the installation. For new PC installations using DianePXE, the applied packages will be installed immediately after the first reboot.
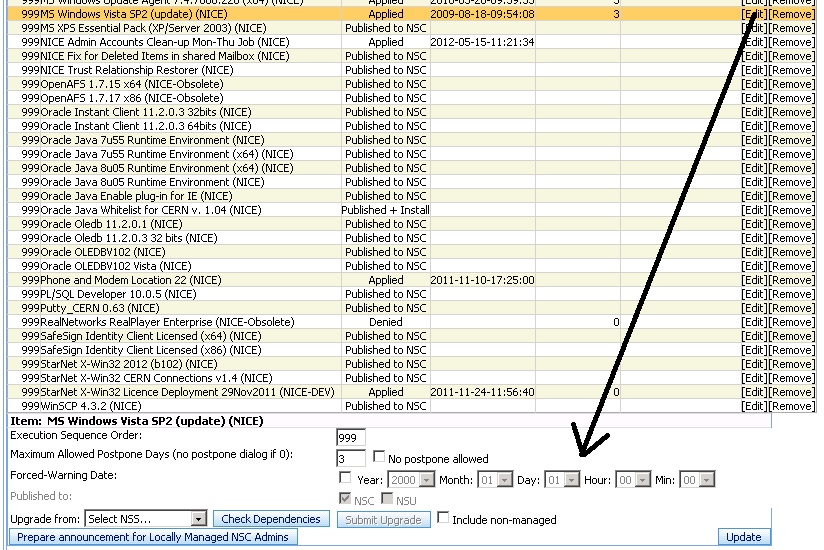
The 'Prepare Announcement' button, only available to CMF Admins, informs all locally managed NSC responsible persons about the deployment of the concerned package. This is useful in the case that the central NICE services publishes or applies a new package (e.g. critical patch) which will become mandatory after the expiration date.
- Upgrade From: This special feature is reserved for CMF administrators only. It upgrades one or more obsolete package(s) to the selected package for all computers which are member of the given NSC. If the NSC is centrally managed, only centrally managed PCs will be affected. PCs which are member of this centrally managed NSC, but locally managed through another NSC will not be affected. In the other case, when the given NSC is locally managed, all member PCs will be affected.
This upgrade will in fact make the following changes to the Add/Remove database table for each affected PC having an entry for the old package:
- Deletes all entries for the old package where an entry "checked" or "unchecked" is found.
- Verifies if there is already an entry for the new package in the data table. If not, a new entry is created with the setting ("checked" or "unchecked") of the old package. Otherwise, this entry is overwritten only if it is not set to "checked".
Possible scenario's:
| Initial setting old package | Initial setting new package | Upgrade result for old package | Upgrade result for new package |
|---|---|---|---|
| Unchecked | Not set | Not set | Unchecked |
| Unchecked | Unchecked | Not set | Unchecked |
| Unchecked | Checked | Not set | Checked |
| Checked | Not set | Not set | Checked |
| Checked | Unchecked | Not set | Checked (forced upgrade) |
| Checked | Checked | Not set | Checked |
Note that the old package should neither be Applied nor Published+Installed to the NSC, otherwise the old package could block the upgrade. However the new package should be at least Published to the NSC.
Adding an Openstack VM to a NSC during creation
A virtual machine in Openstack can be automatically added to a NSC during its creation by specifying the NSC ID in a predefined metadata field via the Openstack web interface.
The responsible or main user of the virtual machine must be administrator or delegated admin of the NSC in order to be allowed to add the VM to the NSC !
To do so, while creating a new VM, go to the Metadata tab, open the 'CMF' item click on the '+' sign next to the 'CMF NSC Memberships' item which will add the CMF -> cmf-nscmems item to the Existing Metadata list. Enter now the NSC identifiers (NSC_ID) separated by a comma.
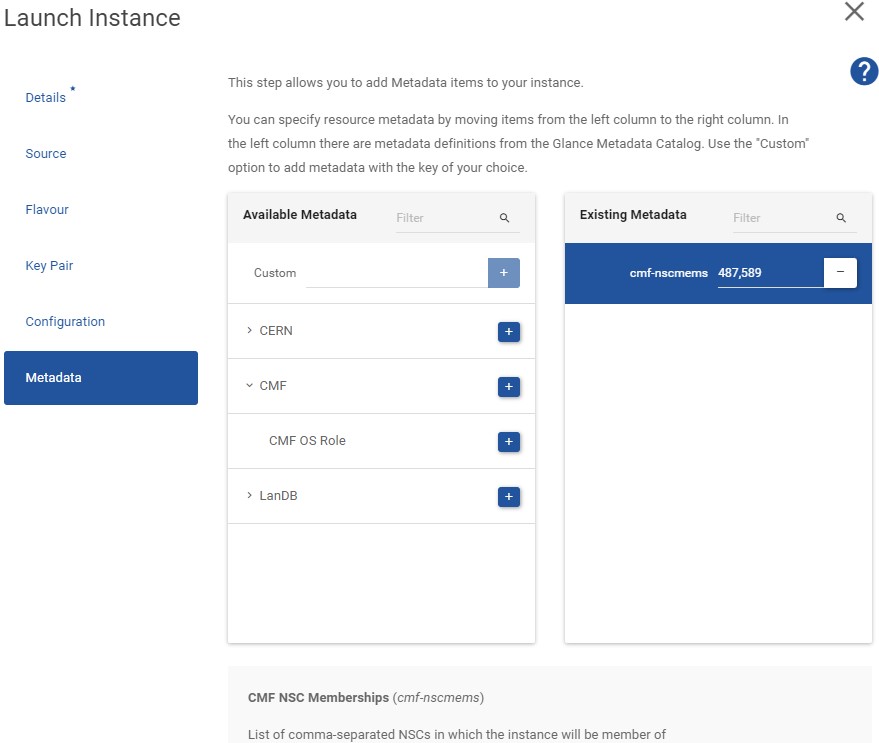
Note that modying this metadata after the VM has been created will only modify the memberships when the VM gets rebuild.
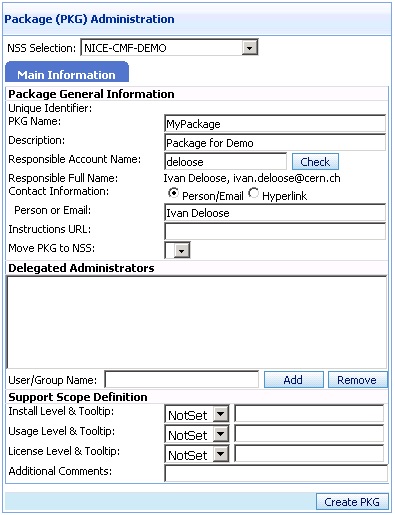
Creating a new Package (Create New PKG)
The creation of a new PKG is limited to the NSS responsible and the delegated administrators. The PKG can on its turn be delegated to the PKG responsible and delegated PKG administrators. The following fields are required to create a new PKG after selecting the concerned NSS:
- Name of the PKG
- A short Description
- Username of the Responsible
Editing a Package (Edit Existing PKG)
The PKG edit window consists of 4 sub pages (tabs):
Main Information, defining general settings about the PKG:
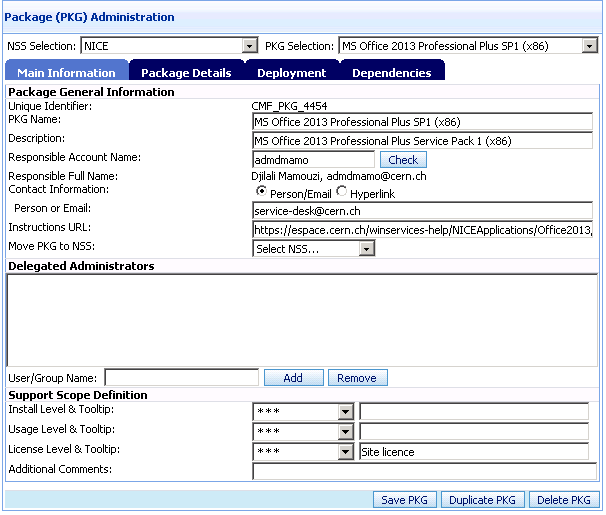
- Unique Identifier: The database record ID, identifying the PKG and displayed as CMF_PKG_[id].
- PKG Name: Name of the package
- Description: A short description for the PKG
- Responsible: Username of the person responsilbe for the package
- Delegated Administrators: You can add delegated administrators by entering their NICE username. The 'Add' button will resolve the entered name to the full name and email address. Both user names and groups are supported.
Package Details:
- Package Type Selection, a package is not only the installation of an application, but can one of the 4 following types:
- Application: This is the most common type, where a package will install an application on the target computer(s).
- Patch (obsolete): The package is a collection of Windows updates. The difference with an application type is the presence detection mode and installation criteria. CMF uses the MBSA scan result to detect the presence of the patch and not the Product Key. This type is only available for global CMF Admins. This type is still present for backwards compatibility issues but has been replaced by the WSUS type.
- WSUS Patch: This package type replaces the obsolete Patch type. CMF uses the WSUS scan result to detect the presence of the patches in the patch list. This type is only available for global CMF Admins.
- Policy Settings: A package can also be used to configure the look and feel of your computers, or to setup some restrictions. The policy settings package in fact the integration of Microsoft Group Policies into CMF, by automatically creating a group policy in Active Directory and settings the corresponding permissions. However the CMF web interface cannot be used to set the policies, but the native Microsoft Group Policy Editor is opened by CMF.
- Scheduled Task: This package type allows the administrator to run a job on his group of computers on a regular base.
- The Execution Context:
- System (default): The installation will run in the machine's System context.
- Console User: The installation will run in the console's user context. It is clear that the installation will only take place when a user is logged on. Additional terminal server sessions are not affected.
- All Users: The package will run for all active session. This can be useful to perform some actions on all active sessions (e.g. scheduled task).
The Application Package Type:
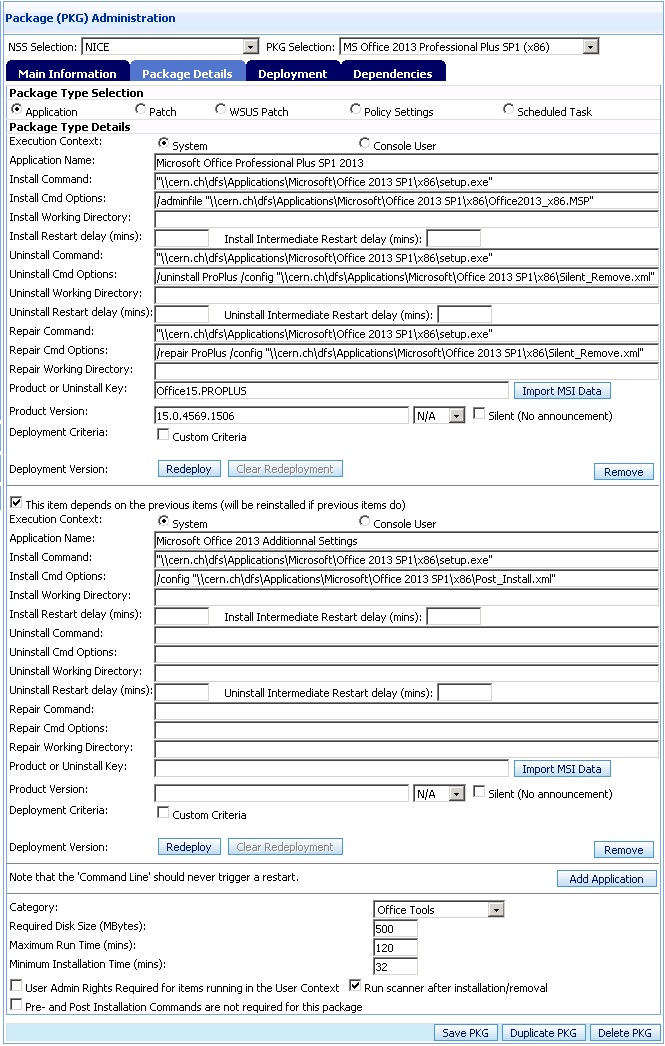
The Package Item: An item is an action to be executed for installation or removal of the package, such running an MSI, setup.exe or VBS script. A package can contain as many items as needed. A new item is added by clicking the 'Add Application' button. The order of the package items can be changed by the 'Up' and 'Dn' buttons. The 'Remove' button will remove the corresponding package item. A package item has the following attributes:
- Application Name: The name of the item. For MSI packages, this name can be automatically retrieved by clicking the 'Import MSI Data' button.
- Install Command: The program to run for the installation, such msiexec.exe, setup.exe, wscript.exe. It is mandatory to specify the full path for programs which are located outside the 'PATH' variable. Note that no option should be added here.
- Install Command Options: All options following the executable should be put here. For MSI packages, it is mandatory to specify the full path.
- Install Working Directory: Some packages, such as PVSS, require the working directory to be set during the execution of the setup, which can be set through this attribute.
- Uninstall Command: The program to run for the removal of the package item, such msiexec.exe, setup.exe, wscript.exe or sometimes uninst.exe. It is mandatory to specify the full path for programs which are located outside the 'PATH' variable. Note that no option should be added here.
- Uninstall Command Options: All options following the executable should be put here.
- Uninstall Working Directory: The working can be set here for the uninstall action in the same way as for the install action.
- Product or Install Key: This key, which is unique for an application, is used by CMF to detect the presence of the application of the computer.
- For MSI packages, this key can be automatically retrieved by clicking the 'Import MSI Data' button.
- For other packages (eg.setup.exe), the application must first be installed on a test PC and search the registry sub key HKLM\Software\Microsoft\Windows\CurrentVersion\Uninstall for the product. The name of the key underneath 'Uninstall' is then the 'Product Key' (e.g. {AHHJ-843984-...}).
- When no key is available, which is the case for installations via a VBS script, CMF uses the return code from the command line to determine successful installation (0 = success).
-
Product Version: For a given application, defined by a product key, it is possible to have multiple versions. In this case, CMF uses the Product Version together with the Product Key to detect the presence of a well defined version of an application.
- For MSI packages, this key can be automatically retrieved by clicking the 'Import MSI Data' button.
- For other packages (eg.setup.exe), the application must first be installed on a test PC and copy the registry value HKLM\Software\Microsoft\Windows\CurrentVersion\Uninstall[ProductKey]\DisplayVersion.
Note: The Uninstall Command and Options can be retrieved from the registry after installing the package item on a test PC. The key is located at : HKLM\Software\Microsoft\Windows\CurrentVersion\Uninstall[ProductKey]
-
Install and Uninstall restart delays: A package should never trigger a reboot by itself, but you can specify if the computer should be restarted after the installation in the two following ways. In case the computer is member of a NSC with the 'Deny Restart' attribute set, the reboot will not be executed but a warning balloon will appear regularly.
- Restart delay: After the installation of several packages, if CMF installs the packages A, B and C at the same time and A needs a reboot, CMF will first install all of them (A, B and C) and then reboot your machine at the end. The value defines the delay in minutes before the reboot will take place. Once a reboot is pending after completing a full installation cycle, no further actions will be undertaken by CMF.
- Intermediate Restart delay: If you need to restart the computer just after the completion of an item of a package, you should enter the delay in this field. CMF will restart the computer specified by the delay and resume the installation of the remaining items just after the reboot. Note: These delays can overridden by the 'No Restart Delays' NSC attribute.
-
Custom Criteria: This attribute should be used with precaution and only if the Product Key and Version are not sufficient or meaningful enough to determine the presence of the package item. The custom criteria is a VB script which should detect the presence of the package item. It is not a criteria for installation, but a detection of the status. The VB script exit code returns the package items status to CMF as follows:
- Exit Code = 0: The item is not applicable on the computer (e.g. item is for other OS)
- Exit Code = 1: The item is present on the computer (installed)
- Exit Code = 2: The item is not present on the computer (not installed)
- Exit Code = 3: The item is present on the computer only if the presence is also detected by the Product Key/Version combination (AND logic)
- Install if previous item is installed: This attribute, which is only available as of the second item, creates a dependency with the previous item. When checked, it forces the item to be (re-)installed if this was the case for the previous item. An example is the case where the first item is the basic version of an application to deploy and the second item an update. Every time the basic gets reinstalled, the update must follow, even if the update was already installed beforehand, because the update could have been overwritten by the re-installation of the basic version.
- Deployment version: In addition to product key and version, it is possible give the package an additional version stamp which is the date of deployment. Clicking the 'Redeploy' button will increase this date version stamp and the package will be re-installed on the client.
- Category: For user convenience, the packages are categorized according to their functionality or application field.
- Required Disk Size: If entered, the value in Mega Bytes is used by CMF to check the available disk space before installation.
- Maximum Run Time: This value in minutes indicates CMF how long the execution of the package may take. CMF will kill the process if this maximum run time is exceeded, or when this field is empty and the process runs for more than 1 hour.
- Minimum Installation Time: This data is only provided for information, displayed in the CMF Pending Actions window on the client PC
The Patch Type:
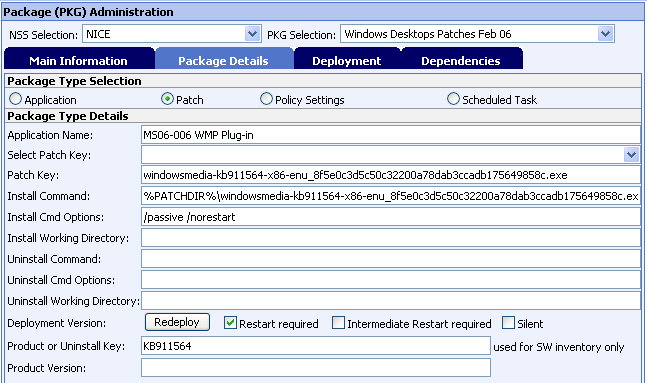
This type of package has been replaced by the WSUS type.
The WSUS Patch Type:
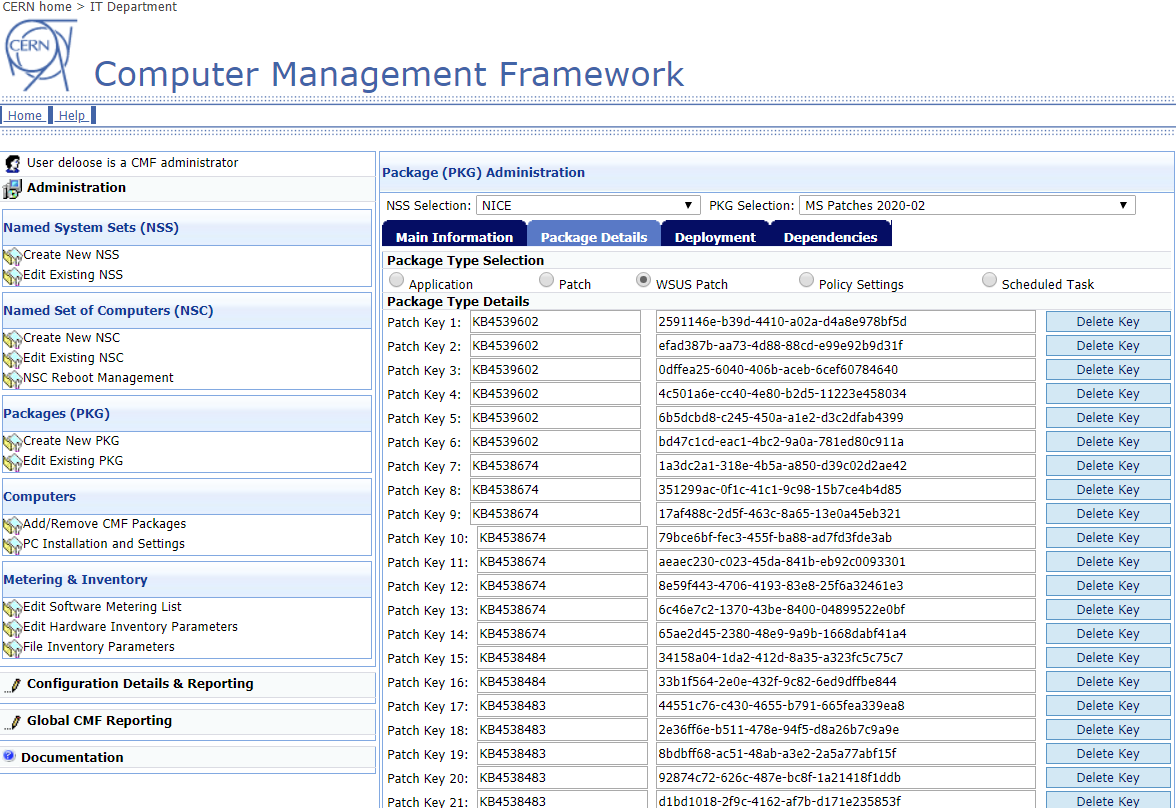
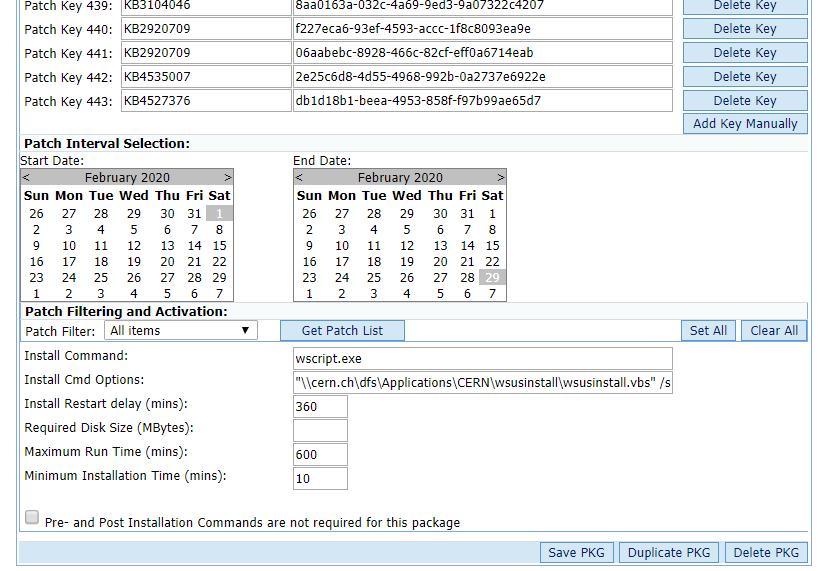
The list of updates is automatically retrieved from the WSUS server for a given period.
This type of package is reserved to global CMF admins, used to deploy the monthly Windows Updates.
The Group Policy Type:
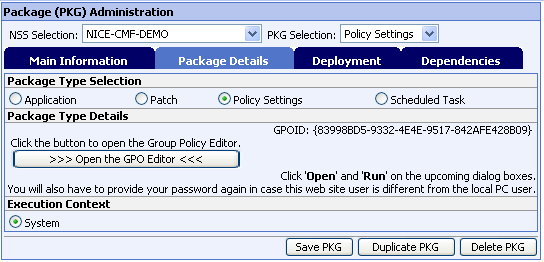
As the native Microsoft GP Editor is required, this package type can only be edited from Windows computers. By clicking on the 'Open' button, CMF will run the GP Editor in the context of the user logged on to the CMF web page. In case the logged on user of the local Windows session is different, a pop-up window will ask for the password. CMF will set the Group Policy name to the PKG unique identifier (e.g. CMF_PKG_999) and set the permissions that the PKG responsible, delegated admins and NSS Administrators can edit the Group Policy Object.
It is strongly recommended to install the Group Policy Management Console (GPMC) on your computer, available in CMF, to check the settings of your GPO. The GPMC can also be used to generate resultant of GPO settings on your target PCs.
For more information about the GPO attribute, please refer to Microsoft documentation.
The Scheduled Task:

Any program can be configured to run on a regular base via this package type. The task should not contain any user interaction or blocking pop-up in order not to disturb the execution of other packages.
Deployment: This sub page defines the operational status and the deployment criteria.
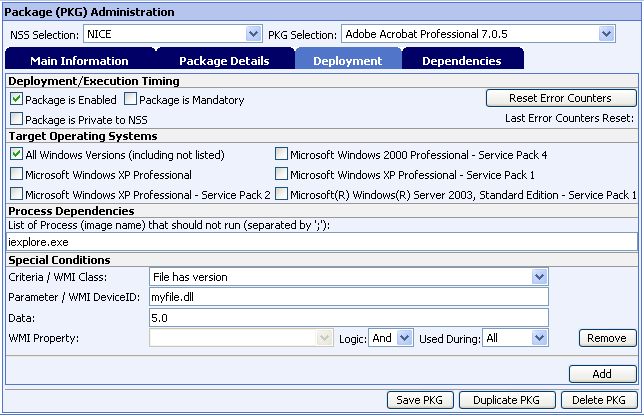
- Package is Enabled: When disabled, the package is nor published in the NSC Package Collections tab, neither in the Add/Remove CMF Packages list and no action is performed for this package on the clients.
- Package is Mandatory: This attribute makes the package to appear in NSC Package Collections tab as mandatory, which means that the locally managed NSCs must plan to apply it in the near future.
- Package is Private to NSS: With this attribute set, the package cannot be re-used outside the NSS, even if the NSS is set as being 'Shareable'. However, packages with this attribute not set and being part of a Shareable NSS, will be available for use in any NSC Collections tab.
- Reset Last Errors: In case a package has generated too many errors (e.g. because a bug in the package) and deployment has been suspended after 3 retries, it is possible to reset the error counter for this package on all computers so that CMF will try again to re-launch the package deployment.
- Target Operating Systems: From the list of check boxes, it is possible to filter the package action depending on the Operating System and Version.
- Process Dependencies: Some packages cannot be installed if some programs are still running. This attribute can contain a list of processes (image name), separated by semi-columns that should not run during installation. In case CMF detects one of these processes specified, it will warn the user by means of a balloon and suspend the installation.
-
Special Conditions: It is possible to create some special criteria for package deployment going from simple file presence and version checks, over custom tasks to WMI based checks. The syntax of 3 types are checks is defined as follows:
- Simple file checks (e.g. File has version)
- Parameter: Full patch to the file
- Data: File version
- Custom task:
- Parameter: Full patch to the task to run and which should return 1 for True and 0 for False.
- WMI based checks (e.g. Win32_LogicalDisk)
- WMI DeviceID: If applicable, select a device here (e.g. C:)
- WMI Property: Select a property here (e.g. FreeSpace)
Multiple conditions can be combined with 'And' and 'Or' logic. It is also possible to apply the checks for an installation or removal action only, or for both.
- Simple file checks (e.g. File has version)
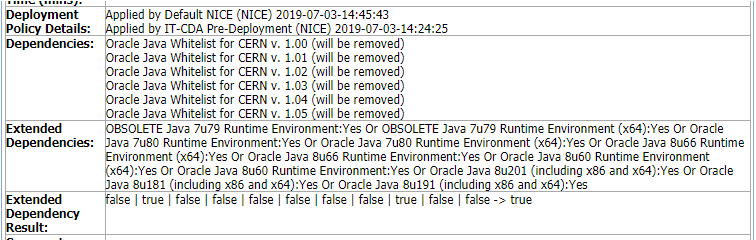
Dependencies:
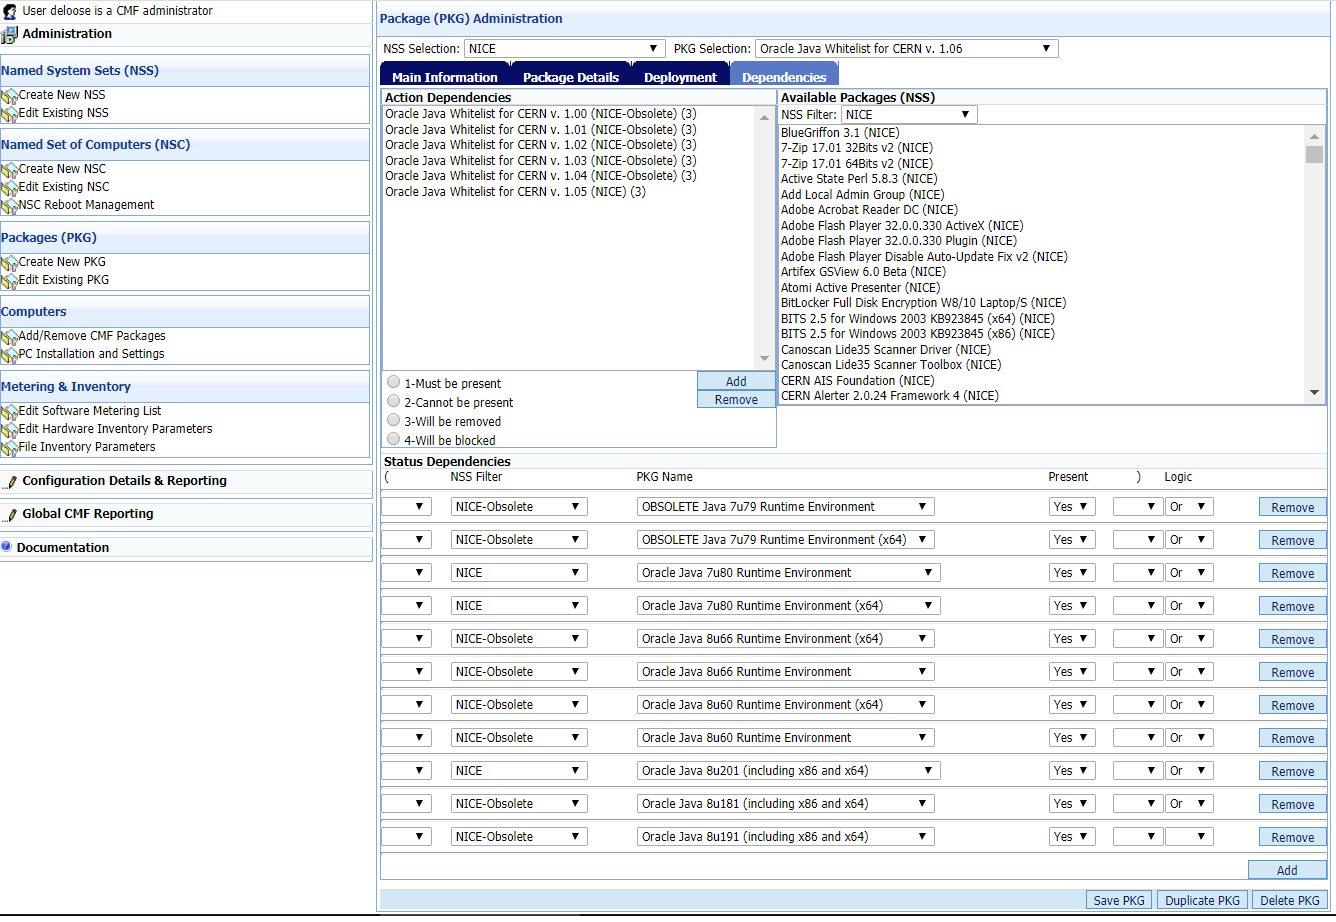
This dependency page gives the possibility the create dependencies between packages. This is useful in situations where the installation of a package depends on the presence of another package. The first part of the page allows simple dependencies between packages of the type AND, it supports 4 modes of dependencies:
- Must be present (1): The package can only be installed if the dependant package is present.
- Cannot be present (2): The package can only be installed if the dependant package is not present.
- Will be removed (3): The package will be installed after the dependant package has been removed by CMF (if it was detected as being present by CMF).
- Will be blocked (4): The dependant package will be denied (it cannot be installed, but it will not be removed if present).
The second part of the page is an extension which allows the creation of a dependency algorithm with custom AND/OR combinations.
This dependency logic is implemented in the CMF client agent, but the result is also visible the Computer Status web page, so that the user can immediately discover why some packages cannot be installed on his computer, due to unfulfilled dependencies.
An example of the result of the algorithm of the extended dependencies configuration above.
Package Documentation
Each package provider can create its own documentation intergrated in the CMF web site.
The package identifier (CMF_PKG_[id]) is used as a folder name to store the documentation web pages. These folders are located in the CERN DFS tree at:
\\cern.ch\dfs\Services\CMF\PKG_DOC
Each package has a subfolder, called CMF_PKG_[id]. Only the package responsible and delegated administrators can create and edit the files inside. To entry page for the documentation should be called default.htm or default.html. If the files exist, CMF will automatically create the link in the Add/Remove CMF packages web page.
Manage Inventory and Metering
The paragraph explains how a list of a programs can be created and used for software metering. It also shows how to set-up a list of device parameters for hardware inventory. Note that the usage of these administration pages is reserved to the global CMF admins.
Software Metering Administration
The software metering page provides the possibility to trace the usage of an application of each CMF client PC, based on a program name (.exe) and an optional version. The version entry supports wildcards, so that multiple versions can be included. The CMF client agent is using an event driven detection mechanism so that even very short usage of these program are logged. These logs are sent back to the distribution points on a regular base.
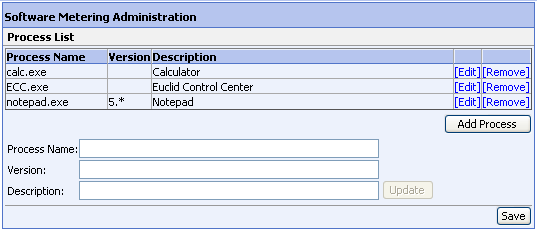
Note that this page is reserved to the global CMF admins.
Hardware Inventory Administration
The hardware inventory page provides the possibility to collect the hardware configuration of each CMF client PC. A list of the most important WMI classes can be used to select the hardware parameter to be retrieved (e.g. WIN32_LogicalDisk class and FreeSpace property). The CMF client reads these parameters on the client PC and sends back the data to the distribution points on a regular base.
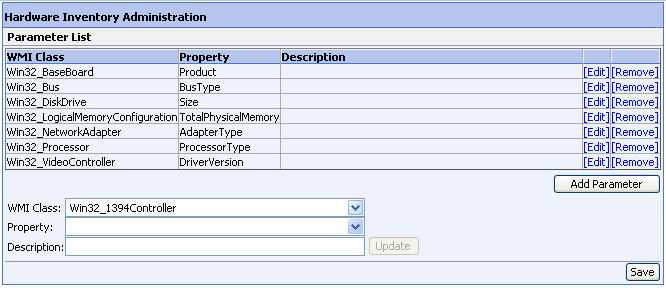
Note that this page is reserved to the global CMF admins.
File Inventory Administration
The file inventory page provides the possibility to collect information such as modification date, creation date, file version and size about the listed files for each CMF client PC. The File Path entry supports environment variables as illustrated. The CMF client retrieves these parameters on the client PC on a regular base and sends back the data to the distribution points.
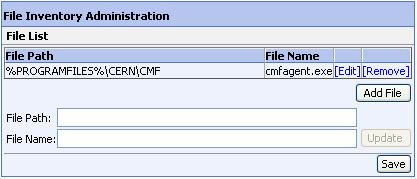
Note that this page is reserved to the global CMF admins.
View and Reporting
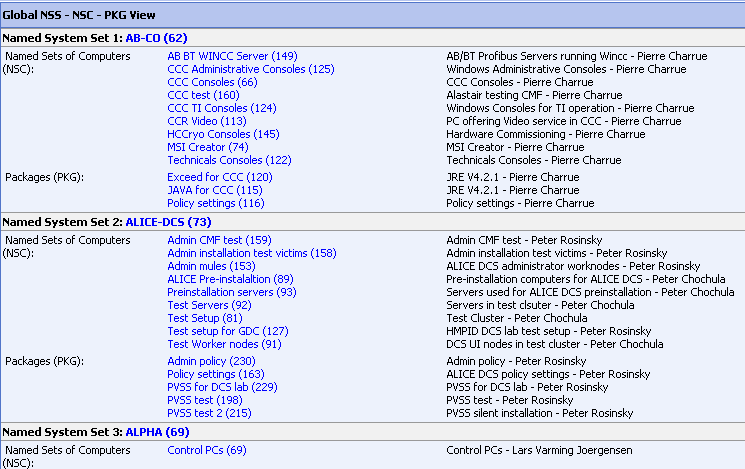
Global NSS-NSC-PKG View
This page returns a summary of all objects present in the CMF database. This page can be useful when searching for a NSC or PKG. All objects contain links to more detailed information pages.
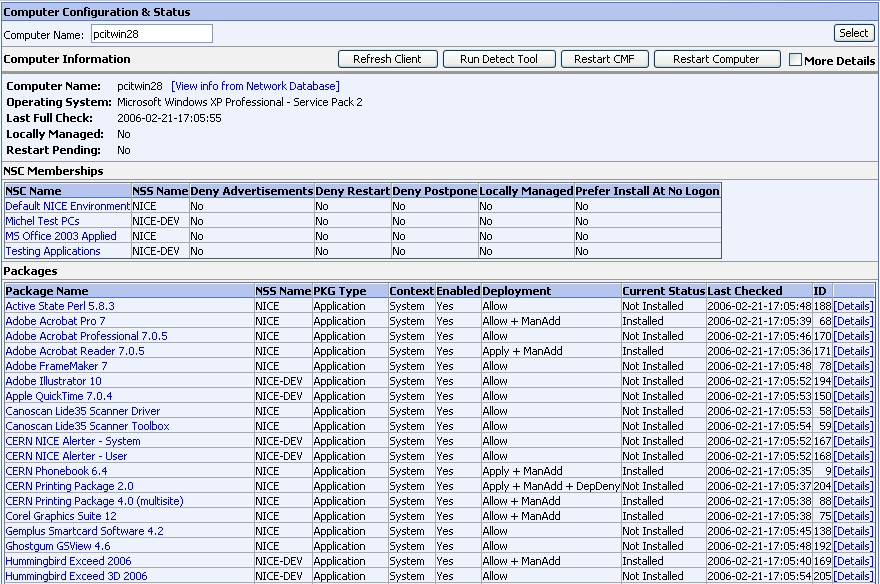
Computer Configuration & Status
This page is providing a full status report of a single computer, including a lot of detailed information about installation timestamps, exit codes, etc. It is probably one of the most useful pages for diagnostics.
Clicking the [Details] link returns a detailed view for the package:

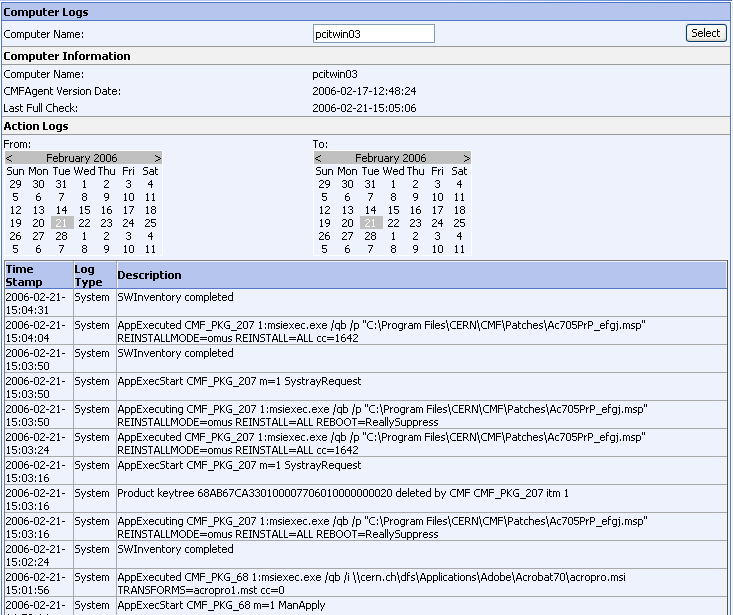
Computer Action Log
The action log lists all actions carried out by the CMF client agent and system tray icon. It is very useful to trace any kind of client problems.
Package Status Page
This page returns the deployment status on all targeted computers for a given package. It gives a quick look for the package responsible to verify the deployment and eventual problems with his package.
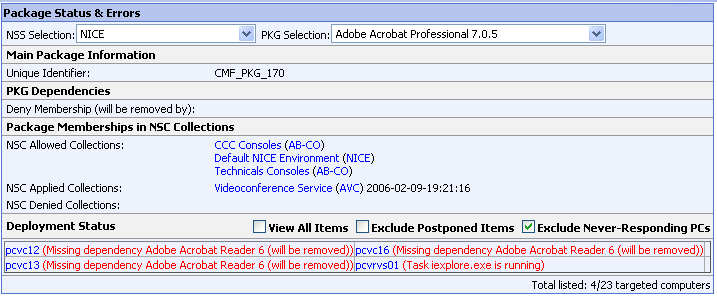
By default, the page only lists computers where the package is missing, including postponed items, which are in fact not real errors. These postponed items can be masked by clicking the 'Exclude Postponed Items' checkbox. You can also filter the PCs which never sent any feedback (probably they are not running the CMF client), by clicking the 'Exclude Never-Responding PCs' checkbox. The 'View All Items' checkbox lists all targeted PCs, including the good ones.
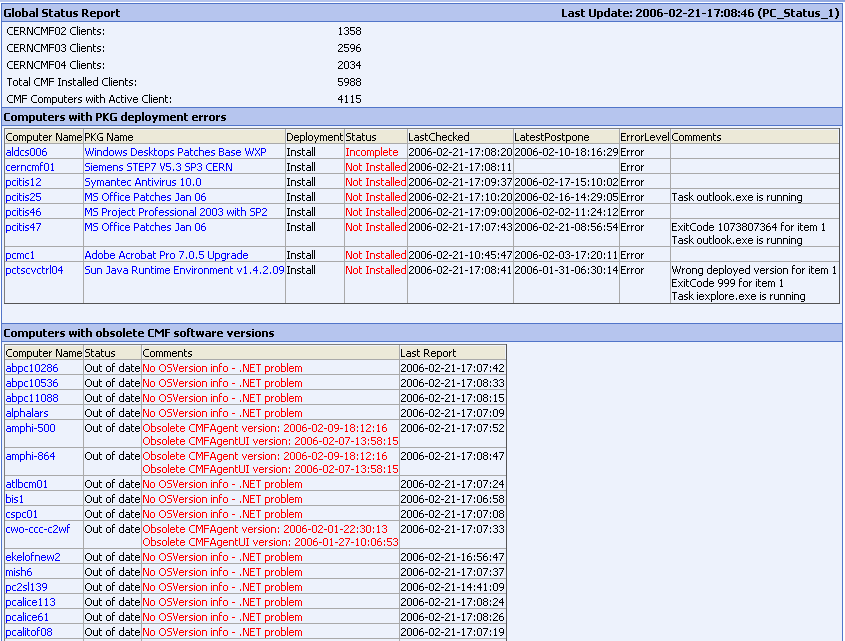
Global Status and Error Report
The global status page returns information about the distribution point status as well as problems with package installation and critical errors on participating computers, such as .NET problems, CMF software version inconsistencies, missing reports, etc.
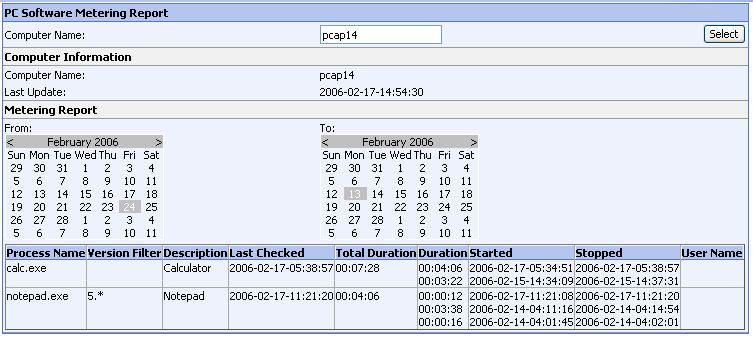
Software Metering Report
This report is a result of the configuration of the software metering parameters, described in the administration section. For a given PC, this page returns the usage of all subscribed programs.
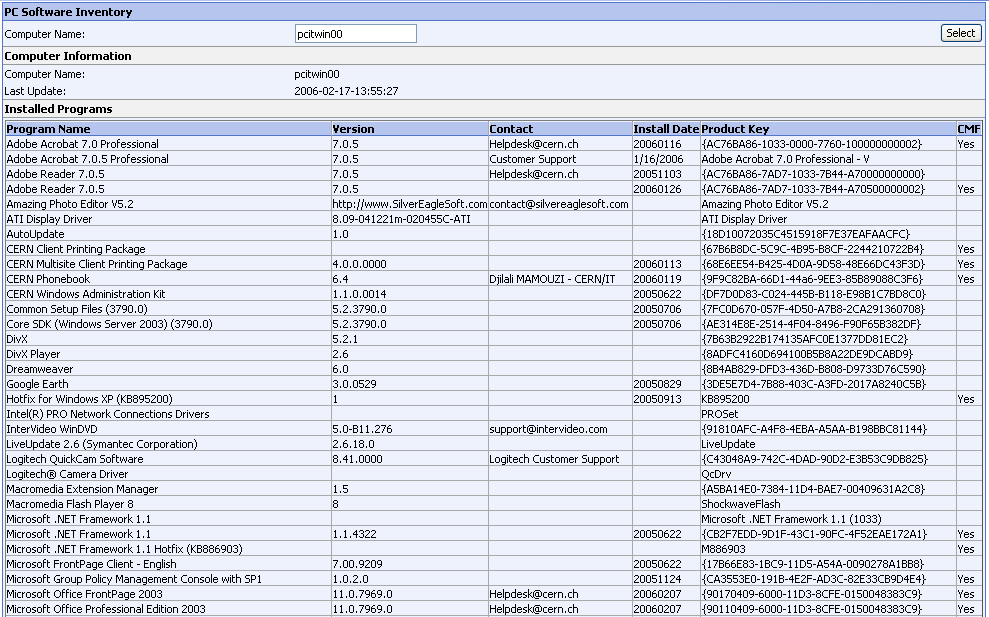
Software Inventory List
This list is a dump of all installed applications on the client PC, with an indication if the application is managed by CMF or not. The client CMF agent takes this information with the registry at HKLM/Software/Microsoft/Windows/CurrentVersion/Uninstall.
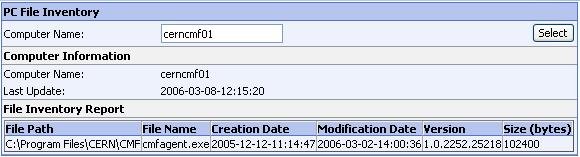
File Inventory Report
This report is a result of the file list registered in the file inventory setup page, described in the administration section. For a given PC, this page returns detailed file information which is scanned by the CMF client agent on a regular base.
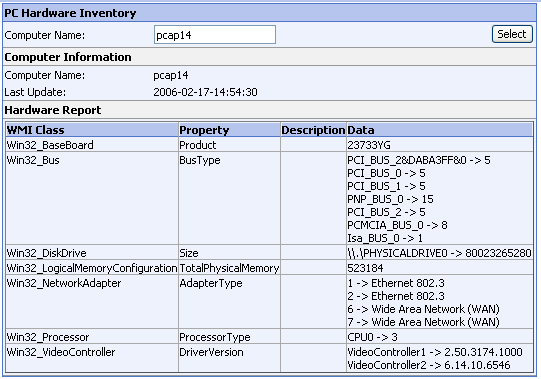
Hardware Inventory Report
This report is a result of the WMI parameters registered in the hardware inventory page, described in the administration section. For a given PC, this page returns the hardware configuration which is scanned by the CMF client agent on a regular base.
SQL Reporting
Creating a new SQL report
This procedure intends to explain the general steps involved creating a
SQL report. These ones may change subject to further development.
CMF managers are the ones allowed to create SQL reports.
1. Creating the Query
Using SQL Query Analyzer, connect to CMF database and test your query. A final result of this step is a query where some parameters should be specified, i.e.
select REP_PC_Status.PCNAME as PCName, Name, Version, InstallDate, REP_PC_Status.OSVersion
from REP_PC_SW_Status INNER JOIN  REP_PC_Status on REP_PC_Status.ID=REP_PC_SW_Status.PC_Status_ID
where REP_PC_SW_Status.Name LIKE @SOFT and REP_PC_SW_Status.InstallDate > @BEGIN
where @SOFT and @BEGIN must be specified by the requestor.
2. Defining the query via XML
The query is deeply linked with the controls that will be used to
provide the needed information.
Via XML we will define the controls, the contents of these controls in
case i.e. a combobox, the layout, interdependencies among them,...
Three controls are supported at this time:
- System.Web.UI.WebControls.DropDownList
- System.Web.UI.WebControls.Calendar
- System.Web.UI.WebControls.TextBox
It's recommended to do a cut and copy of an actual XML definition (from https://www.cern.ch/winservices-cmf-dev/SQLReporting/SQLRepository) and then customize it to fit your requirements. For example:
<?xml version="1.0" encoding="utf-8" ?>
<SQLDefinition>
    <Name>Computers where a specific application have been installed</Name>
    <Description>Machines where an application has been installed</Description>
    <Param>
        <name>@Name</name>
        <description>Name of the application</description>
        <sqltype>SqlDBType.Int</sqltype>
        <sqlpredefined>
            <![CDATA[
            select Name,ID from PKG_List where PackageType=1
            ]]>
            </sqlpredefined>
        <guitype>System.Web.UI.WebControls.DropDownList</guitype>
        <type>2</type>
    </Param>
    <Query>
        <![CDATA[
        select REP_PC_Status.PCName as PCName, REP_PC_Status.OSVersion as "Operating System", REP_PKG_Status.InstallExit as "Installed date", REP_PKG_Status.InstallStatus from REP_PC_Status INNER JOIN REP_PKG_Status ON REP_PC_Status.ID=REP_PKG_Status.PC_Status_ID where InstallStatus='Installed' and PKG_ID=@Name
        ]]>
    </Query>
</SQLDefinition>
Most of the parameters are self-explained:
- name: it's used in the SQL queries and it should start by '@'
- sqltype: it's the .NET type for the value of the data set by the user.
- sqlpredefined: sql query to retrieve possible values. Used always with a DropDownList.
Link to this we find the 'type' parameter. It affects how the dropdownlist control will be built (display and value parts). Consider the following parameter specification:
<Param>
    <name>@QueryString * @Property</name>
    <description>WMI Property and class</description>
    <sqltype>SqlDBType.VarChar</sqltype>
    <sqlpredefined>
        <![CDATA[
        SELECT QueryString,Property FROM INV_HW_List ORDER BY QueryString
        ]]>
    </sqlpredefined>
    <guitype>System.Web.UI.WebControls.DropDownList</guitype>
    <type>XXX</type>
</Param>
Possible values for type will be:
- 0: list items will be like: display part -> QueryString, value part -> Property
- 1: list items will be like: display part -> QueryString * Property, value part -> QueryString-Property
- 2: list items will be like: display part -> QueryString * Property, value part -> Property
- 3: In case the query will retrieve three fields like: SELECT QueryString,Property,Name FROM INV_HW_List ORDER BY QueryString, list items will be like: display part -> QueryString * Property, value part -> Name
You should use the case that fits in you query. Further types may be needed in the future. In case your 'sqlpredefined' retrieves only one field, there is no need for type tag.
- autopostback & sqlparampredefined & dep: in case two (or more) parameters are linked one each other like:
<Param>
    <name>@NSS</name>
    <description>NSS to consider</description>
    <sqltype>SqlDBType.Int</sqltype>
    <sqlpredefined>
        <![CDATA[
        select NSS_List.Name, NSS_List.ID from NSS_List
        ]]>
    </sqlpredefined>
    <guitype>System.Web.UI.WebControls.DropDownList</guitype>
    <autopostback>true</autopostback>
</Param>

<Param>
    <name>@NSC</name>
    <description>NSC to consider</description>
    <sqltype>SqlDBType.Int</sqltype>
    <sqlpredefined>
        <![CDATA[
        ]]>
    </sqlpredefined>
    <sqlparampredefined>
        <![CDATA[
        select NSC_List.Name, NSC_List.ID from NSC_List where NSS_ID=@NSS
        ]]>
    </sqlparampredefined>
    <guitype>System.Web.UI.WebControls.DropDownList</guitype>
    <autopostback>true</autopostback>
    <dep>@NSS</dep>
</Param>
If the first parameter changes the second should be updated as depends on it as 'dep' tag indicates (and in this case also the third one and so on).
- Query: the sql query whose results the requestor will use
3. Use the query.
You only need to place the XML file in a directory related to the SQL repository. This indicated by 'PathToQueries' attribute in the web.config. The system will dynamically recognize the new query and will add it automatically in the queries tree.
Accessing my SQL report via SOAP.
CMF managers are the ones allowed to give SOAP access to SQL reports.
Once you have your XML definition for an SQL query. To create its SOAP version is easy. You only need to use the REPORTID tag with the next number available, i.e.:
<?xml version="1.0" encoding="utf-8" ?>
<SQLDefinition>
    <Name>Computers having installed a software</Name>
    <Description>Computers having certain software installed</Description>
    <ReportID>1</ReportID>
    <Param>
        <name>@SOFT</name>
        <description>Software to look for i.e. %Framework%</description>
        <sqltype>SqlDBType.Varchar</sqltype>
        <sqlpredefined>
            <![CDATA[
            ]]>
        </sqlpredefined>
        <guitype>System.Web.UI.WebControls.TextBox</guitype>
    </Param>
    <Param>
        <name>@BEGIN</name>
        <description>Begin of interval</description>
        <sqltype>sqldbtype.datetime</sqltype>
        <sqlpredefined>
            <![CDATA[
            ]]>
        </sqlpredefined>
        <defaultvalue>2010/01/01</defaultvalue>
        <guitype>System.Web.UI.WebControls.Calendar</guitype>
    </Param>
    <Query>
        <![CDATA[
        select REP_PC_Status.PCNAME as PCName, Name, Version, InstallDate, REP_PC_Status.OSVersion from REP_PC_SW_Status INNER JOIN REP_PC_Status on REP_PC_Status.ID=REP_PC_SW_Status.PC_Status_ID where REP_PC_SW_Status.Name LIKE @SOFT and REP_PC_SW_Status.InstallDate > @BEGIN
        ]]>
    </Query>
</SQLDefinition>
To optimize access to the web service the reports are collected at initialization time and they are stored in an Application state variable. You need to recompile the application to get new reports in memory. Modifying the XML definition is not enough. Normally this should be ok, because you will test the reports in the dev site and then once everything is ok you will push them to the production site where next web request will have them available. On CMF site the Web Service can be accessed at SOAP interface
Two methods are available:
- AvailableReports: description of all SOAP reports
- RunReports, two parameters are required:
- ReportID: reference number
- Parameters: for example for ReportID:2 we could send as parameters: @APP=Ecc.exe;@BEGIN=Sunday, August 13, 2006 12:00 AM;@END=Friday, August 25, 2006 12:00 AM. ';' is used as separator among fields.
How to get access to SQL and SOAP reporting
Your NICE account needs to be part of 'CMF-LOCAL-ADMINS' list or belong to the security group 'CMF Report Access' in order to have rights to invoke SQL reports or the Web Service.