Joining the CERN domain
The following procedure can be followed to join a Windows computer to the CERN domain and receive CMF.
Requirements
Only computers used for official CERN activity are authorized to connect to the CERN domain.
- After the computer joins the CERN domain, by default it will be managed centrally by CERN IT department.
- It means that this device will receive monthly security updates and may be restarted according to the software deployment schedule.
- If this does not correspond to the user requirements, the owner will have to ensure that it is "locally managed" (see point 2 below).
To join a Domain, user must first ensure that
- The device is correctly registered on the CERN Network database. See How To?
- The user has a valid CERN Account on the CERN Domain.
- The device is running Windows 10/11 Pro or Enterprise editions.
- Name of Domain: CERN
Procedure
The procedure in details:
- Go to the CERN Network database, log on with your CERN username and password and find the computer that you want to join to the domain. Check with what name this computer is registered on the network. Also, make sure that it is registered with Windows operating system. If it is not, update the information in the network database and wait for email notification (or 15 minutes). In the rest of this document, we will assume that the computer is registered as MY_PC.
- If MY_PC is supposed to be “locally managed”, make sure that your local administrator added it to the relevant locally managed NSC. If you don’t know about anything about locally managed NSCs, just skip this step and after joining the domain your computer will receive the standard NICE configuration.
- Log on to MY_PC.
- On the Start screen, type Control Panel, and then press ENTER.
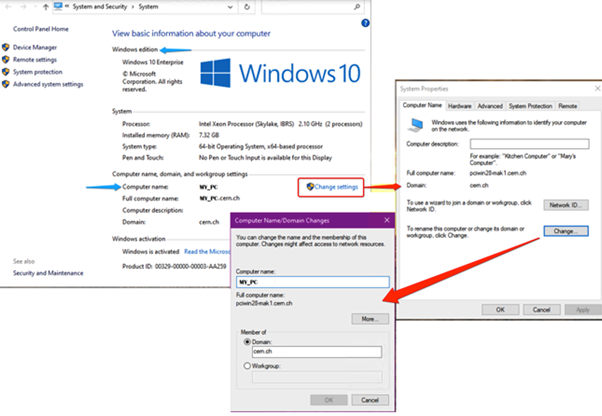
- Navigate to System and Security (view by Category), and then click System.
- Under Windows edition, you will see the operating system of MY_PC. Check if it is on the list of Windows Operating Systems supported at CERN. If it is not, CERN Helpdesk may be able to provide advice on upgrading to the supported operating system, or you will need to check this with the vendor of your hardware.
- Under Computer name, domain, and workgroup settings, click Change settings.
- On the Computer Name tab, click Change. Check before if the Full computer name is the same as the name registered in the network database (in our example: MY_PC). If it is not, rename the computer and reboot it before proceeding to the next step
- Under Member of, Select Domain and enter cern.ch as the domain name. Click OK.
- When you are asked for the domain and password, enter your CERN username and password. Confirm. You will see the confirmation pop-up saying "Welcome in the cern.ch domain." Restart your PC.
- After restart, a number of administrative tools will be installed on your computer, including CMF. This will normally take between 15 minutes and 2 hours. Click “OK” on any information pop-ups you may see, but otherwise wait until all installations are finished. Then restart the computer once more.
- You can now log on the computer using your CERN username and password, which is the recommended method.